Provisioner Guide
This guide is intended to help instructors get the workshop provisioned and ready for students.
Table of Contents
- Reference Architecture
- Pre-Flight Checklist
- Populating The Extra-Vars File
- Running the Provisioner
- Pre-provisioning the Devices
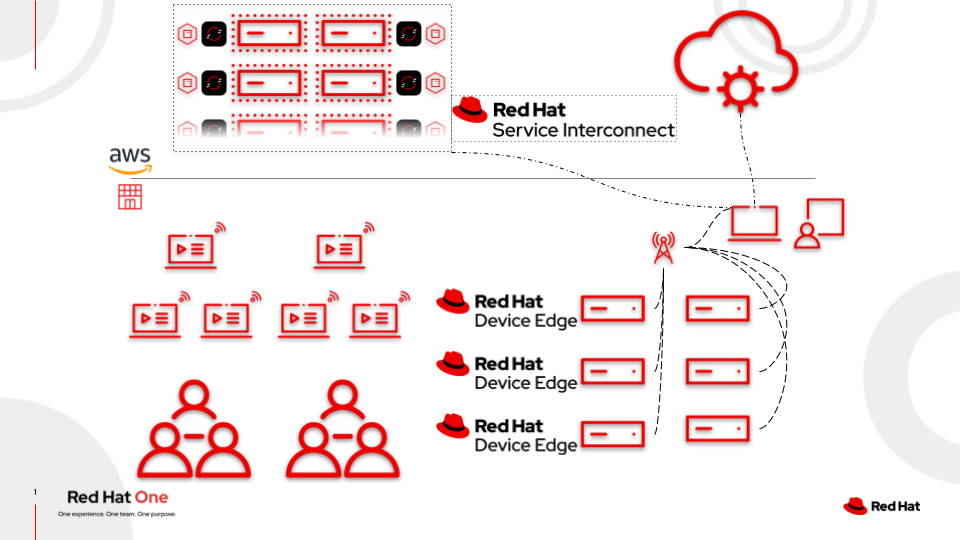
Refernce Architecture
Pre-Flight Checklist
Before beginning the provisioning process, ensure the following things are ready and available:
1. An Edge Management System
This can be any system that can run RHEL9 and has at least 2 cores, 4GB RAM, and 100GB of disk. It should also have two available network interfaces, at least one wired connection for the “internal” connection, and a second “external” connection that can be wired or wireless. The external connection requires internet access during provisioning and during the workshop, as it will act as a router for the edge devices and students in the room. The system should be standard RHEL registered to the customer portal. Minimal installs and workstation installs are both fine.
See [1] on the reference architecture image.
Note
If you requested edge devices and would like to use them, sample kickstarts can be found in the example-kickstarts directory.
2. An AWS Account
This workshop runs many of the core services and services needed by students in AWS. Two platforms are used: If you are a Red Hat associate, a blank open AWS environment requested through RHDPS will work, and comes with a generic DNS domain that can be used.
Ensure you export the AWS credentials before running the provisioner:
export AWS_ACCESS_KEY_ID=YOURACCESSKEYHERE
export AWS_SECRET_ACCESS_KEY=YouRS3dh4TKEYHeRE
See [2] on the reference architecture image.
Note:
To make environment variables permanent and persistent you can set this to your
~/.bash_rc. See Red Hat Knowledge Base article: https://access.redhat.com/solutions/157293
3. A ZeroSSL Account
This is totally free to set up and allows wildcard certificates to be issued. Once registered, create an API key on the developer page.
4. A Red Hat Customer Portal Account
This account needs to be able to access the container registry and pull images, but does not need any further access.
5. A Red Hat Customer Portal Offline Token
This token is used to authenticate to the customer portal and download software. It can be generated here.
6. Lab Network Infrastructure
It’s highly recommended to provide WiFi for students and student devices so everyone is on the same network without needing cables run to all student spots. Any generic wireless access point will work, as long as it’s set to just “access point” mode, meaning no DHCP, DNS, routing, NAT, etc. The Edge Managemnet box will be providing those services, all that needs to be done is for the wireless router to extend the network.
7. An Imaging Station
This is just a wired connection into the lab network (such as the ports on a wireless access point), a keyboard, monitor, and a few outlets. The devices provision on the wired network then connect to the wireless network, and can be safely disconnected from the wired network.
Generally speaking, one imaging station per ten students is a good ratio to keep things moving, but technically you only need one.
8. The Ability to Run Ansible Playbooks
This can be ansible in a venv, or ansible-navigator, either will work.
9. An Ansible Controller Manifest
In order to use Automation controller (i.e. controllerinstall: true), which is the default behavior (as seen in group_vars/all.yml) you need to have a valid subscription via a manifest.zip file. To retrieve your manifest.zip file you need to download it from access.redhat.com.
- Here is a video by Colin McNaughton to help you retrieve your manifest.zip: https://youtu.be/FYtilnsk7sM.
- If you need to get a temporary license, get a trial here http://red.ht/try_ansible.
- Follow the following KCS on how to generate the manifest file https://access.redhat.com/solutions/5586461
How do you use the manifest.zip with the workshop?
These are the ways to integrate your license file with the workshop:
- Put the manifest.zip file into provisioner folder
The first way is to make sure your license/manifest has the exact name manifest.zip and put it into the same folder as the provision_lab.yml playbook (e.g.) <your-path>/workshops/provisioner/manifest.zip
- Turn the manifest.zip into a variable
The second way is to turn the manifest.zip into a base64 variable.
This allows the manifest.zip to be treated like an Ansible variable so that it can work with CI systems like Github Actions or Zuul. This also makes it easier to work with Automation controller, in case you are spinning up a workshop using Automation controller itself.
To do this use the base64 command to encode the manifest:
base64 manifest.zip > base64_platform_manifest.txt
Take the output of this command and set it to a variable base64_manifest in your extra_vars file.
e.g.
base64_manifest: 2342387234872dfsdlkjf23148723847dkjfskjfksdfj
On macs, specify the -i flag:
base64 -i manifest.zip > base64_platform_manifest.txt
Note
The manifest.zip is substantially larger than the tower.license file, so the base64_manifest base64 might be several hundred lines long if you have text wrapping in your editor.
Note
base64 is not encryption, if you require encryption you need to work within your CI system or Automation controller to encrypt the base64 encoded manifest.zip.
- Download the manifest.zip from a URL
If you specify the following variables, the provisioner will download the manifest.zip from an authenticated URL:
  manifest_download_url: https://www.example.com/protected/manifest.zip
  manifest_download_user: username
  manifest_download_password: password
Populating The Extra-Vars File
Copy the example extra-vars file for your desired workshop from provisioner/example-extra-vars/rhde_aap_rhsi.yml to the root of the project and modify according to the comments in the file.
Creating an Inventory File
You’ll need an inventory file to tell ansible about the device that will be used as your Edge Management system. Create a file locally with the following information, substituting where necessary:
all:
  children:
    local:
      children:
        edge_management:
          hosts:
            edge-manager-local:
              ansible_host: 1.2.3.4
              ansible_user: ansible
              ansible_password: ansible
              ansible_become_password: ansible
              external_connection: enp0s31f6 # Connection name for the external connection, could be wifi
              internal_connection: enp2s0 # Interface for the lab network, should be wired
Note
Do not use
rootas your ansible_user, use a non-root account that can sudo.
Note
ini-formatted inventories are fine, as well as using ssh keys, this is just a standard inventory file. Since the provisioner isn’t creating the host (like for aws instances), connection information must be provided.
Running the Provisioner
Note:
The provisioner has an execution environment available on quay.io with all requirements baked in. In addition,
ansible-navigatoris required, which can be installed into a virtual environment locally.
1. Using Ansible-Navigator
You must run from the project root rather than the /provisioner folder. This is so all the files in the Git project are mounted, not just the provisioner folder. This is also best practice because it matches the behavior in Automation controller.
ansible-navigator run provisioner/rhde_aap_rhsi.yml --inventory local-inventory.yml --extra-vars @extra-vars.yml -v -m stdout
Note
Parts of the provisioner create files locally then push them to the provisioned services. There’s no harm in having the provisioner re-template out these files, however to speed things up a volume mount can be used. Ensure your user owns the directory that will be bind mounted. See below for an example.
ansible-navigator run provisioner/rhde_aap_rhsi.yml --inventory local-inventory.yml --extra-vars @extra-vars.yml --mode stdout --execution-environment-volume-mounts /path/to/tmpdir:/tmp:Z -v
2. Using Ansible-Playbook
It’s recommended to create a virtual environment to house the python libraries required for the provisioner.
Make sure to install the prerequired python libraries by running:
pip install -r execution-environment/requirements.txt
Make sure to install the prerequired collections by running:
ansible-galaxy install -r execution-environment/requirements.yml
Then run the provisioner:
ansible-playbook provisioner/rhde_aap_rhsi.yml -e @extra_vars.yml -i inventory.yml
Pre-provisioning the Devices
If you have physical devices for students to use, they can be provisioned ahead of time. You’ll need a keyboard and monitor. Connect them over ethernet to the edge management node (or the network powered by it), and boot from the network. The edge-management node will provide DHCP, DNS, TFTP, iPXE, and the ostree repo files needed to zero-touch provision the devices. If WiFi settings were defined during provisioning, the devices will auto-connect to the network after rebooting.
See [3] on the architecture diagram.