Workshop Exercise 3.2 - Booting an Edge Virtual Machine
Table of Contents
- Objective
- Step 1 - Copying Our Customized ISO to the VM Storage
- Step 2 - Attaching the ISO to your Virtual Machine
- Step 3 - Adjusting the Boot Options
- Step 4 - Powering On the Virtual Machine
- Solutions
Objective
In this exercise, we’re going to attach our customized ISO to our edge virtual machine and provision the system.
Virtual machines have already been created on the edge hypervisor and are awaiting our customized ISO so they can be provisioned.
For a reminder on how to access the Cockpit WebUI, review exercise 1.4. For information on connecting to the hypervisor node via SSH, refer to your student page.
Step 1 - Copying Our Customized ISO to the VM Storage
First, we’ll copy our customized ISO to a location where we can attach it to a virtual machine. A directory has been created for us at /var/virtual-machines/iso.
From within the generate-iso directory, copy your ISO into the destination directory while being sure to insert your student number into the destination filename: sudo cp rhde-ztp.iso /var/virtual-machines/iso/student$(your-student-number)-rhde-ztp.iso
For example: sudo cp rhde-ztp.iso /var/virtual-machines/iso/student1-rhde-ztp.iso
Step 2 - Attaching the ISO to your Virtual Machine
Navigate to the Cockput WebUI and select the Virtual machines tab. By default, no Virtaul Machines will be populated as the management of Virtual Machines requires elevated access. Click on the Limited Access button at the top of the page to gain Administrative privileges. Once selected, Virtual Machines will appear.
Select the virtual machine associated to your student ID. The naming convention for virtual machines is student$(your-student-number)-edge-device, so for example: if you are student 1, your virtual machine is student1-edge-device.
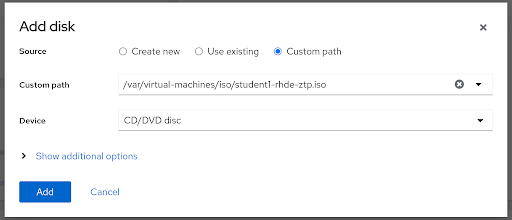
Under the Disks section, select the Add disk button. In the Add disk path, enter the following information:
| Parameter | Value |
|---|---|
| Source | Custom path |
| Custom path | /var/virtual-machines/iso/student$(your-student-number)-rhde-ztp.iso |
| Device | CD/DVD Disc |
Click Add
Step 3 - Adjusting the Boot Options
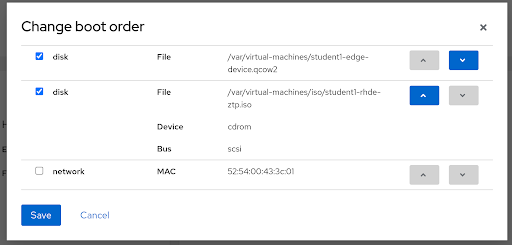
Back on the overview page for your virtual machine, in the Overview section, click edit next to the word disk in-line with Boot order.
In the Change boot order window, ensure that both the first disk (the virtual hard drive) and the cdrom devices are checked, with the virtual disk being the first option, and the cdrom being the second.
Click Save
Step 4 - Powering On the Virtual Machine
At this point, we should be able to power on the virtual machine and observe it completely provision itself without our intervention.
Click the Run button at the top of the page and observe the process.
Solutions

Navigation
| Previous Exercise | Next Exercise |