Preparation - Lab deployment
Table of Contents
- Prepare your AWS environment
- Get your ZeroSSL free Account
- Get your Red Hat Customer Portal Offline Token
- Get your AAP Setup TAR file
- Get your Pull Secret
- Get your Slack Token
- Get your Ansible Controller Manifest
- Copy the container images to your Quay account
- Prepare your laptop and lab servers
- Clone this repo and prepare files
- Deploy the lab
- If something goes wrong during the deployment…
- Pre-flight checks
- BONUS - If there is not enough time for your demo…
Prepare your AWS environment (even for the local lab architecture)
The lab needs a valid public DNS domain name. The playbooks that deploy the lab are prepared to configure AWS Route53 service to provide the required public DNS names (it was the easier way to assure valid domain names), so even though you are using the local lab architecture, you will need access to AWS to let the playbooks configure the names for you.
If you are a Red Hatter you can order an AWS Blank Open Environment in the Red Hat Demo Platform than can be used just for the Route53 service (local lab architecture) or for both Route53 and EC2 to run the Management node (AAP + EDA + Image-builder + Gitea) in case of the remote lab architecture.
Note
Remember to include the right purpose and SFID or customer name just in case you need to contact the RHDP team to be sure that your environment won’t be deleted or removed before your demo.
Once you have your environment, take note of:
- Route53 domain
- AWS_ACCESS_KEY_ID
- AWS_SECRET_ACCESS_KEY
Get your ZeroSSL free Account
The Ansible playbooks will create Certificates to be used by the HTTPS services, so you need to issue valid SSL certs. An easy way to do it is by using ZeroSSL.
This is totally free to set up and allows wildcard certificates to be issued. Once registered, create an API key on the developer page.
You need an “EAB Credential for ACME Clients”, so generate one from that developer page. It will be something like this:
EAB KID
XXXXXXXXXXXXXXXXXXX_XX

EAB HMAC Key
XXXXXXXXXXXXXXXXXXXXXXXXXXXXXXXXXXXXXXXXXXXXXXXXXXXXXXXXXXXXXXXXX_XXXXXXXXXXXXXXXXXXXX
Take note of both the KID and Key.
Get your Red Hat Customer Portal Offline Token
This token is used to authenticate to the customer portal and download software. It can be generated here.
Note
Remember that the Offline tokens will expire after 30 days of inactivity. If your offline Token is not valid, you won’t be able to download the
aap.tar.gz.
Take note of the token.
Get your AAP Setup TAR file
Note
This step is optional, since in case that the file is not found, the Ansible playbooks will use the offline token to download it. Nevertheless is recomended to download it manually since from time to time the AAP releases a new minor version and then the Setup file SHA will change, preventing the playbook from downloading it (You get a
HTTP Error 403: Forbiddenerror while trying to download theaap.tar.gzfile).
You need to download the Ansible Automation Platform Setup (not the Setup Bundle). Here you can find the 2.4 version, the most recent and last version tested so far (Dec. 2023).
Save your file as aap.tar.gz.
Get your Pull Secret
Get your pull secret from the Red Hat Console
Get your Slack Token
The demo will send notifications to a Slack Channel, so you will need to generate a Token. You can follow these steps:
-
Goto https://api.slack.com/apps and click on the “Create New App” button to create a new slack application.
-
In the next popup add a new App Name and select the Slack Workspace and click on the Create App button
-
Once the application is created in the Add features and functionality section click on the Permissions button to set the token scopes. Enable the
chat:writepermission -
Next step go to the “Install App” menu on the left and install the application in the desired workspace and allow access to the requested scopes. Click on the Install App to Workspace button
-
Then you get the OAuth Access Token.
You will end up with a token like this one:
xoxp-XXXXXXXXXXXXX-XXXXXXXXXXXXX-XXXXXXXXXXXXX-XXXXXXXXXXXXXXXXXXXXXXXXXXXXXXXX
Get your Ansible Controller Manifest
In order to use Automation controller you need to have a valid subscription via a manifest.zip file. To retrieve your manifest.zip file you need to download it from access.redhat.com.
You have the steps in the Ansible Platform Documentation
-
Go to Subscription Allocation and click “New Subscription Allocation”
-
Enter a name for the allocation and select
Satellite 6.8as “Type”. -
Add the subscription entitlements needed (click the tab and click “Add Subscriptions”) where Ansible Automation Platform is available.
-
Go back to “Details” tab and click “Export Manifest”
Save apart your manifest.zip file.
Note
If you want to check the contents of the ZIP file you will see a
consumer_export.zipfile and asignatureinside.
Copy the container images to your Quay account
During the demo you will need to push or move tags in certain container images (take a look at minute 25:25 in the video), so you will need to have access to a container image repository. Probably you want to use Quay.io so first, check that you can login:
podman login -u <your-quay-user> quay.io
Once you have access to the registry, copy the container images that we will be using (those are public in my Quay.io user luisarizmendi). You can pull them to your laptop and then push it to your registry, or you can just use skopeo:
skopeo copy docker://quay.io/luisarizmendi/2048:v1 docker://quay.io/<your-quay-user>/2048:v1
skopeo copy docker://quay.io/luisarizmendi/2048:v2 docker://quay.io/<your-quay-user>/2048:v2
skopeo copy docker://quay.io/luisarizmendi/2048:v3 docker://quay.io/<your-quay-user>/2048:v3
skopeo copy docker://quay.io/luisarizmendi/2048:prod docker://quay.io/<your-quay-user>/2048:prod
skopeo copy docker://quay.io/luisarizmendi/simple-http:v1 docker://quay.io/<your-quay-user>/simple-http:v1
skopeo copy docker://quay.io/luisarizmendi/simple-http:v2 docker://quay.io/<your-quay-user>/simple-http:v2
skopeo copy docker://quay.io/luisarizmendi/simple-http:prod docker://quay.io/<your-quay-user>/simple-http:prod
Remember to change visibility of both 2048 and simple-http images to “public” in each “Repository Settings”
Prepare your laptop and lab servers
Your laptop will need to run Ansible Playbooks. This can be ansible in a venv, or ansible-navigator, either will work but using ansible-navigator is recommended since it’s already integrated with execution environments, which makes easier to fulfill all the required dependencies since those will be pre-provisioned in the container image (where you will be running the playbook) instead on your own laptop OS.
If you don’t have it already on your machine you can follow these steps to install ansible-navigator.
You will also need git to clone the repo in the next step and, if using VMs, a virtualization hypervisor (libvirt and Virtual Machine Manager are recommended).
You will also need to configure a SOCKS proxy to reach out to the internal services published in the edge device. Remember that we will be attached to the “external network” of the local server, while the edge device will be in the internal isolated network, so for this demo we need to either connect us to that isolated environment or, easier for us, to jump into the local server to reach out to the edge server using a SOCKS proxy (already configured as part of the deployment). What I usually do is to configure it in a separate Web Browser. The settings are:
SOCKS Host: <external IP of the local server or the one located in AWS>
Port: 1080
proto: SOCKS_v5
Besides your laptop, you will also need a server (or two if you decide to deploy the external architecture lab) where the services will be installed and an additional machine that will act as the edge device.
You can use either VMs or physical hardware, also bear in mind that depending on if you plan to use the local or the external architecture you will need different minimum requirements in your local servers, since in the remote lab topology all the “heavy” services will be run in AWS.
Using Virtual Machines
Let’s start with the server VM.
That VM must have two NICs: external and internal. The external must have access to Internet and the internal will be the one where the edge devices that will be installed during the lab/workshop will be attached (and where the local server will act as gateway, DHCP, PXE,…).
When using VMs, the external network can be directly the default NAT virtual network (you can always create a new network with NAT and use that one for external). You don’t strictly need DHCP since you are installing manually (or with Kickstart) your RHEL in the local server you can configure static IPs too but DHCP is more convenient.
The internal network must not have DHCP or NAT configured (you will need to configure a new “isolated” network) since the local server will be the DHCP and default Gateway.
The minimum resources for that VM will depend on the chosen lab architecture.
If you plan to use the lab local architecture, the VM should have 4 cores/16GB RAM/ 50GB+ disk ( I was able to deploy it with just 10GB of RAM.. and even with just 8GB, but sometimes in that case the deployment failed due to timeouts… although you can always try to re-run the deployment to overcome that problem…)
If you choose the lab external architecture, this VM will only host the Ansible Execution Node and some network services (DHCP, PXE, …) so you could go with 2 cores / 4GB RAM / 50GB+ Disk.
Once you have the server VM created, you have to to deploy RHEL 9 on it (lab tested with RHEL 9.2), “minimal install”. When you configure your network you don’t need to configure the internal network, just the interface that will be the external (with either DHCP or static IP) since the playbooks will configure it for you.
Add the ansible user to that server and be sure that you add it into the sudoers group.
In addition to the server, you will need enough resources (2 cores, at least 2.5 GB RAM, 10GB disk) to create an additional VM that will act as edge device. That edge device VM will be attached with a single NIC to the isolated (with no DHCP) virtual network that you have created and where the previous server is attached to.
You don’t need to create the VM before the lab, you just need to have enough resources to create it during Section 2 - Automated device onboarding.
Using Physical servers
Two machines: the server and the edge device.
Well… you can read the previous point about using VMs and translate that to the physical world (bear in mind the comment about minimum resources depending on the type of lab architecture used).
The server must have at least two NICs, one connected to the Access Point / Router and the other one to the edge device.
You need to install RHEL 9 on that first server (lab tested with RHEL 9.2), “minimal install” is enough.
Add the ansible user to that server and be sure that you add it into the sudoers group.
The edge device BIOS needs to be configured to perform boot from network as first option (or you can use efibootmgr --bootnext XXX if you have a Linux OS pre-installed)
You will also need to connect the video output to a screen (or use a Video Capture card attached to your laptop) because you will need to show the boot console during the steps.
Clone this repo and prepare files
Clone the this repo:
git clone https://github.com/redhat-manufacturing/device-edge-workshops
IMPORTANT
Clone the repo and checkout to the gitops-demo which is the stable branch for this demo.
Now you have to perform some actions on the cloned repo:
1) Include the AAP Manifest
You have two options to use the Manifest during the deployment.
a. You can put the Manifest file into the provisioner folder of the cloned repo (with the exact name manifest.zip), so: <your-git-clone-path>/provisioner/manifest.zip
b. Turn the manifest.zip into a base64 variable and include it in the extra-vars.yml file (see next point):
base64 manifest.zip > base64_platform_manifest.txt
Note
On macs, specify the
-iflag:base64 -i manifest.zip
2) Create the extra-vars.yml file
Copy the example extra-vars file from <your-git-clone-path>/provisioner/example-extra-vars/rhde_gitops.yml to the root of the project with the name extra-vars.yml (<your-git-clone-path>/extra-vars.yml)
Fill in all the XXXXX with the right values, more specifically:
- Domain name in
base_zone - Slack token in
slack_app_token - Pull Secret in
pull_secret - Red Hat subscription user and password in
redhat_usernameandredhat_password - ZeroSSL KID and Key in
zerossl_account.kidandzerossl_account.key - Red Hat offline token in
offline_token - Quay account in
apps.app1.registryandapps.app2.registry
You can also change these values:
- Number of AAP,Gitea,… accounts in
student_total(it could be useful to have more than one to run a dry-run before the demo) - The AWS region to be used in
ec2_region -
The AAP Manifest as base64 (if you chosed this option) in
base64_manifestNote
Be sure that if you don’t use variable method to include the Manifest (ie. if you are using directy the file as shown in the method “a”) you have to have the
base64_manifestvar commented out. Keep the variable “undefined” in order to make direct use of the file (base64_manifest: ""does not work because it will overwrite yourmanifest.zipconverting it into a 0 bit file, so be sure to undefine the var).
You also need to configure an important parameter here, that will deploy either the local or external architecture. If you want to run the local architecture you should configure run_in_aws: false and if you want in contrast to deploy the lab external architecture this variable should be run_in_aws: true
3) Copy the right workshop_vars file
Besides the variables in extra-vars.yml the deployment will use morevariables that can be found in <your-git-clone-path>/provisioner/workshop_vars/rhde-gitops.yml. Those variables are slightly different depending if you are deploying the local architecture or the external architecture.
The rhde-gitops.yml file does not exist in the repo, and you will need to create it by copying the right file depending if you want to use the local or the external lab architecture.
For local lab architecture:
cp <your-git-clone-path>/provisioner/workshop_vars/rhde_gitops-local.yml <your-git-clone-path>/provisioner/workshop_vars/rhde_gitops.yml
and if you choose the external architecture:
cp <your-git-clone-path>/provisioner/workshop_vars/rhde-gitops-external.yml <your-git-clone-path>/provisioner/workshop_vars/rhde-gitops.yml
You don’t have to customize any value in that file, except if you have any conflict while using physical servers with the internal (isolated) IP range used (by default the 192.168.40.0/24 ). Remember that as part of the deployment, the Ansible Playbooks will configure the secondary NIC interface in the local server (the one connected to the “isolated network”) and add there a DHCP server as well. That network will use the values from this workshop_vars/rhde-gitops.yml file, so if you plan to use physical hardware and you have to connect the external server interface to an 192.168.40.0/24 network (ok, that would be a really bad luck) there will be an overlap between the internal an external interfaces because you will be using the same network in bouth… then is the case where you will need to change this network default value in workshop_vars/rhde-gitops.yml.
4) Create the local inventory file
You have to create an inventory file in <your-git-clone-path>/local-inventory.yml with the following contents.
If you are using the local architecture create the local-inventory.yml with these contents changing XXX with your own values for the local server (AAP + Gitea + Image Builder + Net. tools) where you pre-installed RHEL:
all:
  children:
    local:
      children:
        edge_management:
          hosts:
            edge-manager-local:
              ansible_host: XXX.XXX.XXX.XXX
              ansible_user: ansible
              ansible_password: XXXXXXXX
              ansible_become_password: XXXXXXXX

              external_connection: XXXXXX # Connection name for the external connection
              internal_connection: XXXXXXX # Interface name for the internal lab network
The ansible_host and other variables are related to the VM/Physical server where you installed RHEL that will host the AAP + Gitea + Image Builder + Net tools in the local lab architecture or just the Net tools in the external lab architecture.
The ansible_password and ansible_become_password are the credentials created for the ansible user that was included in the local edge manager server when you installed RHEL.
The external_connection variable expects the Connection name that you get when running nmcli con list (“NAME” column) in the local edge server (so where AAP + Gitea + Image Builder + Net tools will be installed). The internal_connection expects the interface name (which is the name on the “DEVICE” column in the ouput of the nmcli con list command). Usually the connection name is the same than the interface name, but in some cases (ie. wireless connections) the connection name is different (in that case it will be the SSID).
Note
When using physical servers I suggest using an external access point / router as part of the lab infrastructure, so you will maintain the cabled interface to the servers instead of using Wireless (in case they have that option), which will keep the network name unaltered. If you finally end up using Physical servers with wireless and no external access point/router then when you move to the venue where you will be running the demo/workshop you probably the SSID will be different, so you will need to change the new network name to the
firewalldzoneexternalto allow traffic outgoing to the external network from internal. You can do it with this command:nmcli connection modify <new SSID> connection.zone externaland then reload the connection withnmcli connection up <new SSID>. (I also recommend going to the venue the day before to prepare everything in advance, including this setup if needed). Another option is to use your mobile hotspot SSID but in events with many people, depending on the location, sometimes the mobile network speed is super slow and that will bring you some headaches.
If you are using the external lab architecture use the contents below instead (where edge_management has been changed by edge_local_management ) but complete the XXX with the values for the server that is also local (the one containing just the net. tools) and where you pre-installed RHEL:
all:
  children:
    local:
      children:
        edge_local_management:
          hosts:
            edge-manager-local:
              ansible_host: XXX.XXX.XXX.XXX
              ansible_user: XXXXXX
              ansible_password: XXXXXXXX
              ansible_become_password: XXXXXXXX

              external_connection: XXXXXX # Connection name for the external connection
              internal_connection: XXXXXXX # Interface name for the internal lab network
Note
Even thought in the external architecture you will have the local “server” and the one running in AWS, you will only need to include the local one, since the inventory for the remote server will be created dynamically once the deployment playbooks create the VM in EC2.
5) Move your aap.tar.gz file to <your-git-clone-path>/provisioner/aap.tar.gz. Remember that this step is optional but highly recomended.
Deploy the lab
In order to deploy you just need to:
-
Open a bash CLI in
<your-git-clone-path> -
Export the AWS credentials (I use to include them in
extra-vars.ymlfile as reference as well). Remember to do this again if you open a new bash interpreter before running the Ansible playbooks if you don’t include these exports as part of basrc.
export AWS_ACCESS_KEY_ID=XXXXXXXXXXXXXXXXXXXXXX
export AWS_SECRET_ACCESS_KEY=XXXXXXXXXXXXXXXXXXXXXXXXXXXXXXXXXXXXXXXXXXXX
- Run the playbooks with
ansible-navigator:
ansible-navigator run provisioner/provision_lab.yml --inventory local-inventory.yml --extra-vars @extra-vars.yml -vvvv
- Wait. Time will depend on the server resources, network, etc… but it takes a while.
If something goes wrong during the deployment…
Note
If you deployed the external lab architecture, you can find the AWS VM IP by just resolving any of the main services, for example controller.
. . If you need to jump into the AWS server you can go to ` /provisioner/ . ` directory and use the SSH private key (`ssh-key.pem`) that you will find with the `ec2-user` user there by running a command like `ssh -i /provisioner/ . /ssh-key.pem ec2-user@controller. . `.
I’ve seen that sometimes, depending on the DNS servers that you have in your laptop/servers the “populate-xxx” playbooks fail because the server does not find the new domain names configured in AWS (because it could take some time to refresh on your DNS server to get the new values).
You can try to check if that’s the case after the lab deployment by running dig gitea.<sub_domain>.<base_zone> in your laptop, for example you can see here how the domain is not translated to any IP address:
dig gitea.training.sandbox2464.opentlc.com

; <<>> DiG 9.18.20 <<>> gitea.training.sandbox2464.opentlc.com
;; global options: +cmd
;; Got answer:
;; ->>HEADER<<- opcode: QUERY, status: NOERROR, id: 34535
;; flags: qr rd ra; QUERY: 1, ANSWER: 0, AUTHORITY: 0, ADDITIONAL: 1

;; OPT PSEUDOSECTION:
; EDNS: version: 0, flags:; udp: 65494
;; QUESTION SECTION:
;gitea.training.sandbox2464.opentlc.com.        IN A

;; Query time: 819 msec
;; SERVER: 127.0.0.53#53(127.0.0.53) (UDP)
;; WHEN: Tue Jan 02 16:05:18 CET 2024
;; MSG SIZE  rcvd: 67
In order to solve this I use to either configure the static entries in my laptop when running VMs or configure them on the physical Router when using physical hardware, so I’m sure those will be ready when the automation reaches the populate-XXX playbooks (so I don’t need to wait for the DNS refresh).
Note
You can also wait until the DNS entry is resolved before launching the deployment again (there is no need to start over, just run the provisioner again).
Sometimes due to the limited VM resources, the physical Hardware odds, network connectivity or the “Demo Gods” the deployment fails. Do not panic, if you followed the previous steps and have the right variables in place the first thing that you should do is to re-launch the deployment, that probably will do the trick…
Tip
You can navigate through the ansible tasks in ansible-navigator by typing
:<task number>, going back to the previous parent by pressingESCor get the full output by typing:stdout. You can also review the log JSON file that is created in every ansible-navigator run under<your-git-clone-path>/provisioner/provision_lab_artifact-<date>.json
If re-deployment does not work and you don’t find the issue, try to start over from scratch by re-installing RHEL on the server and, if using the external architecture, by running the following playbook that will delete the EC2 instance in AWS:
ansible-navigator run provisioner/teardown_lab.yml --inventory local-inventory.yml --extra-vars @extra-vars.yml -vvv
Lastly, if you are re-using VMs or Hardware, you might find that when you re-install the RHEL Operating System in the servers (ie. after completing a demo/workshop or re-instaling the server after a failed deployment), the system UUID will change, and thus you laptop won’t be able to ssh to it due to an SSH validation mismatching (you will find the error in the wait for all nodes to have SSH reachability step). You can check if that’s the case by trying to ssh to the server, if you have this issue you will find a message like this one:
$ ssh ansible@<your server>
@@@@@@@@@@@@@@@@@@@@@@@@@@@@@@@@@@@@@@@@@@@@@@@@@@@@@@@@@@@
@    WARNING: REMOTE HOST IDENTIFICATION HAS CHANGED!     @
@@@@@@@@@@@@@@@@@@@@@@@@@@@@@@@@@@@@@@@@@@@@@@@@@@@@@@@@@@@
In order to solve it just remove the old hash by running:
ssh-keygen -R <server ip>
Pre-flight checks
These pre-flight checks should be performed just right after the deployment. You can also use them to double-check that everything is ok before your demo…
Both local and external lab architectures
Go (ssh ansible@<ip>) to the server where AAP, Gitea, … are deployed. In case that you have two servers, so when using external lab architecture, the server running those services is the one in AWS).
Check:
- SOCKS proxy:
Check if the service is listening in port 1080 (be sure that is 1080 and not just 11080)
$ ss -ltn | grep 1080
LISTEN 0      128          0.0.0.0:1080       0.0.0.0:*
LISTEN 0      511                *:11080            *:*
LISTEN 0      128             [::]:1080          [::]:*
If not, run this command in the local server if you are using the local architecture:
sudo ssh -o StrictHostKeyChecking=no -N -f -D *:1080 localhost
or this one on the remote aws server if you used the external lab :
ssh -o StrictHostKeyChecking=no -f -N -D *:1080 <local server ansible_user>@localhost -p 2022
After that, with the Web Browser where you configured the SOCKS proxy, try to “Surf” (why we stopped using this word?) the Web .
-
Containers:
Note
The CLI outputs are from a local lab architecture, where both the network services and AAP + Gitea + Image-Buider are installed. If you run these commands in the AWS server when you are using the external lab architecture (where network services are running in the local server) be aware of what services need to be running in each server.
- Non-root containers:
$ podman pod ps
POD ID        NAME                  STATUS      CREATED       INFRA ID      # OF CONTAINERS
c48dcb7aced7  workshop-rhde_gitops  Running     26 hours ago  fe4b2d9148f1  10


$  podman ps
CONTAINER ID  IMAGE                                    COMMAND               CREATED       STATUS        PORTS       NAMES
fe4b2d9148f1  localhost/podman-pause:4.6.1-1701529524                        26 hours ago  Up 9 minutes              c48dcb7aced7-infra
cf8327aa15cf  localhost/reverse-proxy:latest           -c chown -R nginx...  26 hours ago  Up 9 minutes              workshop-rhde_gitops-reverse-proxy
7c2e3978afc5  localhost/eda:latest                     /bin/sh -c ansibl...  26 hours ago  Up 9 minutes              workshop-rhde_gitops-eda
0f6ca7a5c32d  localhost/ipxe:latest                    -c exec /usr/sbin...  26 hours ago  Up 9 minutes              workshop-rhde_gitops-ipxe
00b991e049ec  localhost/database:latest                                      26 hours ago  Up 9 minutes              workshop-rhde_gitops-database
8e979d6c7a4e  localhost/gitea:latest                   /bin/s6-svscan /e...  26 hours ago  Up 9 minutes              workshop-rhde_gitops-gitea
fbad94197407  localhost/tftp:latest                    /sbin/init            26 hours ago  Up 9 minutes              workshop-rhde_gitops-tftp
6f5514afe4d3  localhost/ostree-repo:latest             -c exec /usr/sbin...  26 hours ago  Up 9 minutes              workshop-rhde_gitops-ostree-repo
192838ddff65  localhost/attendance:latest              npm start             26 hours ago  Up 9 minutes              workshop-rhde_gitops-attendance
- Root containers:
$ sudo podman pod ps
[sudo] password for ansible:
POD ID        NAME                       STATUS      CREATED       INFRA ID      # OF CONTAINERS
ea07ed978253  workshop-rhde_gitops-priv  Running     26 hours ago  587a47ad5e76  2

[ansible@edge-manager-local ~]$ sudo podman ps
CONTAINER ID  IMAGE                                    COMMAND               CREATED       STATUS         PORTS       NAMES
587a47ad5e76  localhost/podman-pause:4.6.1-1701529524                        26 hours ago  Up 10 minutes              ea07ed978253-infra
b20d3154d26f  localhost/dnsmasq:latest                 -c /usr/sbin/dnsm...  26 hours ago  Up 10 minutes              workshop-rhde_gitops-priv-dnsmasq
- Access to services:
Open the following:
- AAP Controller: https://controller.
. / - Gitea: https://gitea.
. / - Image Builder: image-builder.
. /
Note
The values of
sub_domainandbase_zoneare the ones defined in theextra-vars.ymlfile
- 2024 APP images:
Go to quay.io in the 2024 repository and check that the “prod” tag is pointing to “v1”. If not just create a new Tag “prod” by pressing the gearwheel on the “v1” label (at the right).
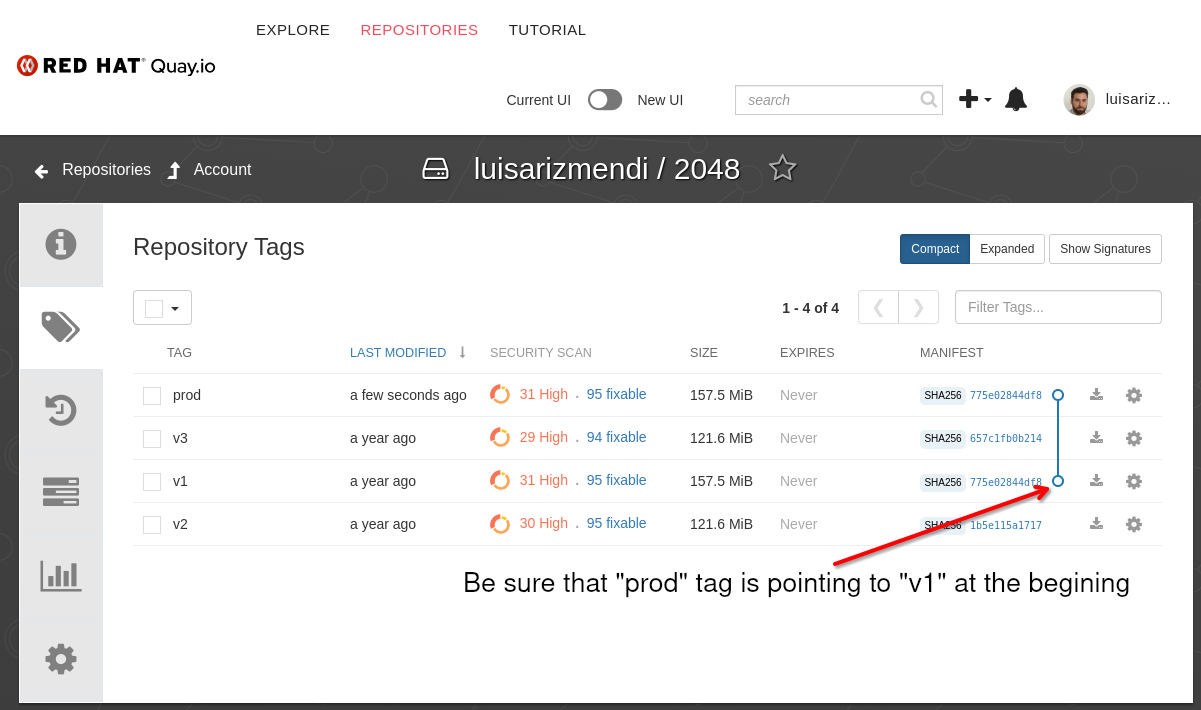
You should also check that the image in the device-edge-configs/APPs/microshift/manifest/2-deployment.yml file on Gitea is v1 and not v3.
If this environment was never used probably it will be correctly assigned but if you already ran the demo the “prod” tag will be probably pointing to “v3”.
Only in external lab architecture
If you deployed the external lab architecture you should also double check:
- The reverse SSH tunnel between your local server and the AWS server:
Loging into the AAP controller Web page at https://controller.
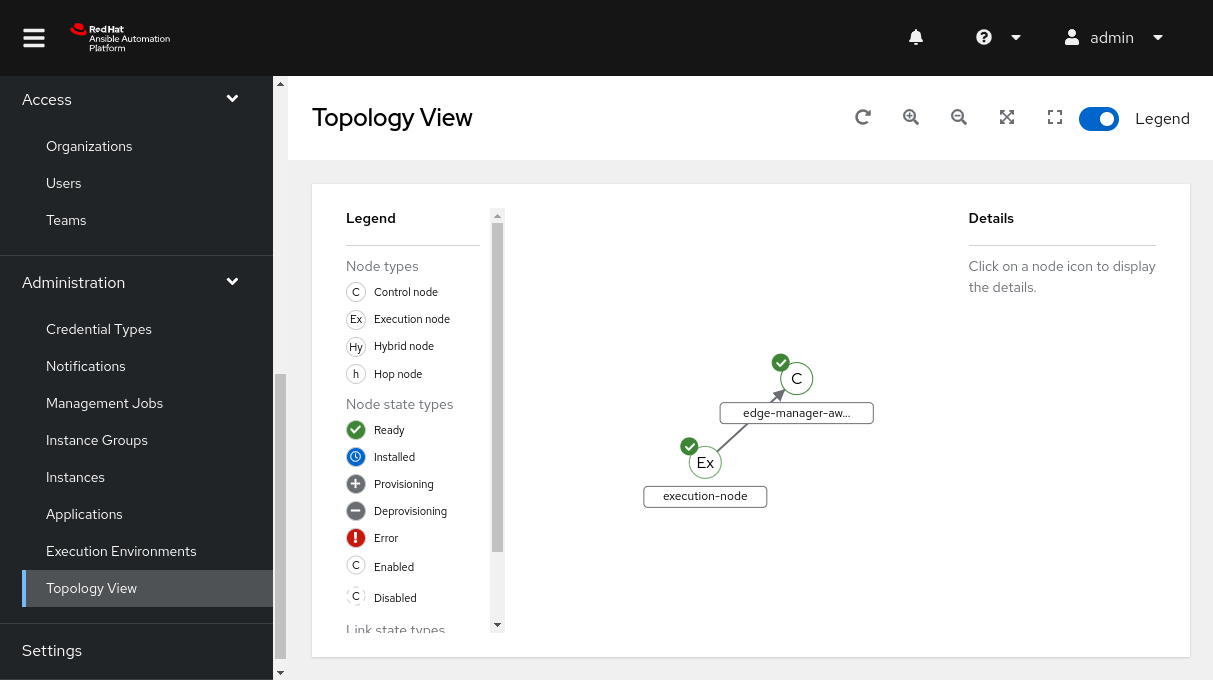
If it is ok, that means that there is connectivity between the AWS server and your local server through the reverse SSH tunnel.
If it’s not green you have to jump into your local server (the reverse SSH tunnel is started from the local server to the AWS server). You can check that you have a background SSH service opening a port 2022 in the remote server:
$ ps aux | grep ssh | grep 2022
root       83015  0.0  0.0  11288  4268 ?        Ss   21:47   0:00 ssh -o StrictHostKeyChecking=no -i /home/<ansible_user>/.ssh/id_rsa -fNT -R 2022:localhost:22 ec2-user@<AWS public IP>
If the service is not there you can try to restart the reverse-ssh-tunnel.service systemd unit or even better, just run the following command to open the tunnel manually:
ssh -g -N -T -o ServerAliveInterval=10 -o ExitOnForwardFailure=yes -o StrictHostKeyChecking=no -i /home/<probably 'ansible'>/.ssh/id_rsa -R 2022:localhost:22 ec2-user@< IP of the AWS server>
There is also another way to test the reverse SSH tunnel, if you are in the AWS server you can try to ssh to the port 2022 using the root user:
[ec2-user@<AAP local IP> aap_install]$  ssh -p 2022 root@localhost
Activate the web console with: systemctl enable --now cockpit.socket

Last login: Thu Dec 21 22:11:09 2023 from ::1
[root@edge-manager-local ~]#
Note
Remember that the tunnel is started by the local server, that means that if you reboot the local server the tunnel will start again with no issue (or if you start both local and AWS servers at the same time), but it you restart the AWS server the tunnel will turn down and you will need to start it manually…(maybe I implement it with
autosshin the future)
BONUS - If there is not enough time for your demo…
Sometimes it could happen that you don’t have the 120 minutes to run the demo. One way to reduce the time is by creating the OS images in advance instead of running the build during the demo.
The demo will need to create at least three OS images (take a look at minute 49:37 in the video):
- The first one used to show how to onboard the device
- The upgraded image without some of the required packages by Greenboot
- The upgraded image but including the required packages
By default, when you “publish” an image the last one that you created is the one that is used. That behaviour can be changed by changing the value latest to the version that you want to publish in the device-edge-images/production-image-deploy.yml file located Gitea, so you could change that to 0.0.1, then create the first image with the provided blueprint (just create, you don’t need to publish until you run the demo), then create the second and third images using the v2 and v3 blueprints.
Then, during the demo, you can just use the “Publish” task. After showing the onboarding, change the device-edge-images/production-image-deploy.yml file to version 0.0.2 in order to publish the second image (that was already created in the pre-demo steps) and then do the same with the third image.
Enjoy the lab!