APPs with Podman and Systemd
In this section we will explore how just using Podman and Systemd we can obtain advanced capabilities without using Kubernetes.
In this first part, we have two test applications already deployed, both as rootless containers, thanks to the kickstart file that we prepared during Section 1: One of them is a simple HTTP server, and the other is a web browser game.
Serverless APP with Podman and Systemd
The “simple HTTP server” is deployed as a Serverless container at the port 8080, which means that if you take a look at the running containers in the edge device you will only see the web browser game at port 8081 in the edge device:
- Run
podman psin the edge device as the non-root user (probablyansibleif you didn’t change in the lab deployment playbooks)
[ansible@edge-848bcd4d1537 ~]$ podman ps
CONTAINER ID  IMAGE                            COMMAND     CREATED         STATUS         PORTS                          NAMES
ef90da4894db  quay.io/luisarizmendi/2048:prod              35 minutes ago  Up 35 minutes  <edge device ip>:8081->8081/tcp  app1
The Serverless container will be created as soon as a request comes to the port 8080. Bear in mind that to prevent starting pulling the container image on the first request, there is a Systemd unit pre-configured in the server that pre-pulls that image, so when you query the Serverless service you get the answer instantaneously, without having to wait to get the Container image ready on the server.
Note
It’s a good idea to run
podman image listas the non-root user to double check that the image (quay.io/<your registry>/simple-http) is there and, if not, pull it manually before continuing with the steps below.
At this point, we can query the Serverless service (on port 8080) and we’ll see how the new container is launched:
- Run
watch podman psin the edge device as the non-root user. Keep this terminal visible to show how the new container is created automatically.
watch podman ps
-
Open the browser (where the SOCKS proxy is configured) in your laptop and query the Serverless application at
http://<edge device IP>:8080. You will get av1 is working!message. -
Show what happened in the terminal where
watch podman pswas running. The new container should be created now
[ansible@edge-848bcd4d1537 ~]$ podman ps
CONTAINER ID  IMAGE                                   COMMAND               CREATED         STATUS         PORTS                          NAMES
ef90da4894db  quay.io/luisarizmendi/2048:prod                               36 minutes ago  Up 36 minutes  <edge device ip>:8081->8081/tcp  app1
823e10fa4a3c  quay.io/luisarizmendi/simple-http:prod  /usr/sbin/nginx -...  35 seconds ago  Up 35 seconds  127.0.0.1:8080->8080/tcp       httpd
- (optional) You could wait 90 seconds and show how the Container is stopped automatically if no new request are made to the service
Podman container image auto-update
If you create a new version of the container image and push it to the registry, two options exist in order automate the upgrade. You can configure a webhook in the container image registry to start a workflow in Ansible Controller, as we’ve seen when reviewing the OS configuration, or, as a second option, you can use a Podman feature called podman auto-update to check the registry for updates and apply them automatically. In our case we will use the second option.
But beyond just deploying new versions when they are available, we will show how podman auto-update can check if the new version is “ok”. If the health-checks are not passed while booting the new version, it will automatically rollback to the previous one. We will demonstrate this by introducing an error in the second version of the image and then fixing it in the third version.
This time we will be using the game app deployed on port 8081 in the edge device, where the Podman auto-update has been configured. Let’s see a possible image upgrade workflow:
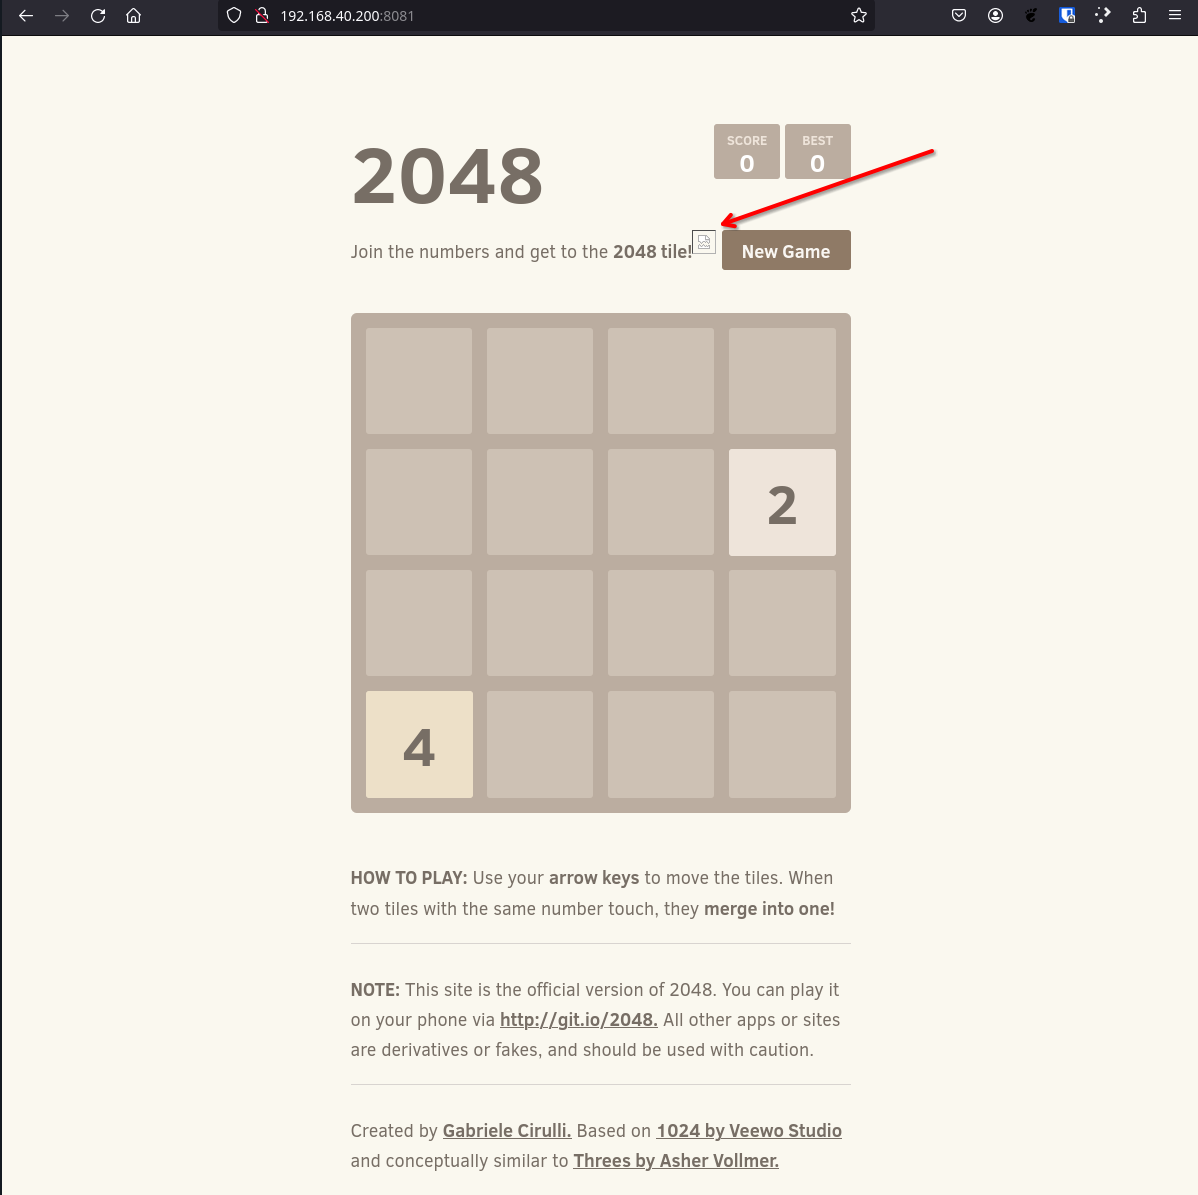
- Open the Web Browser where the SOCKS proxy is configured and open the port
8081on the edge device ip:http:<edge device ip>:8081. You will see a 2048 Web Browser game.
Note
Remember to run the Pre-flight checks before demo to be sure that the 2048 container image tags are correctly set in
quay.io.
- Show a problem with the APP: an embed image is not loading:
- Now the developer should fix the problem on the app and then
pushthe new container image version into the registry. OpenQuay.ioand explain by showing the tags on the 2048 repository that in order to save time what we did is pre-push the new container image in the registry, and we can change from one version to another by just changing where theprodtag is pointing to.
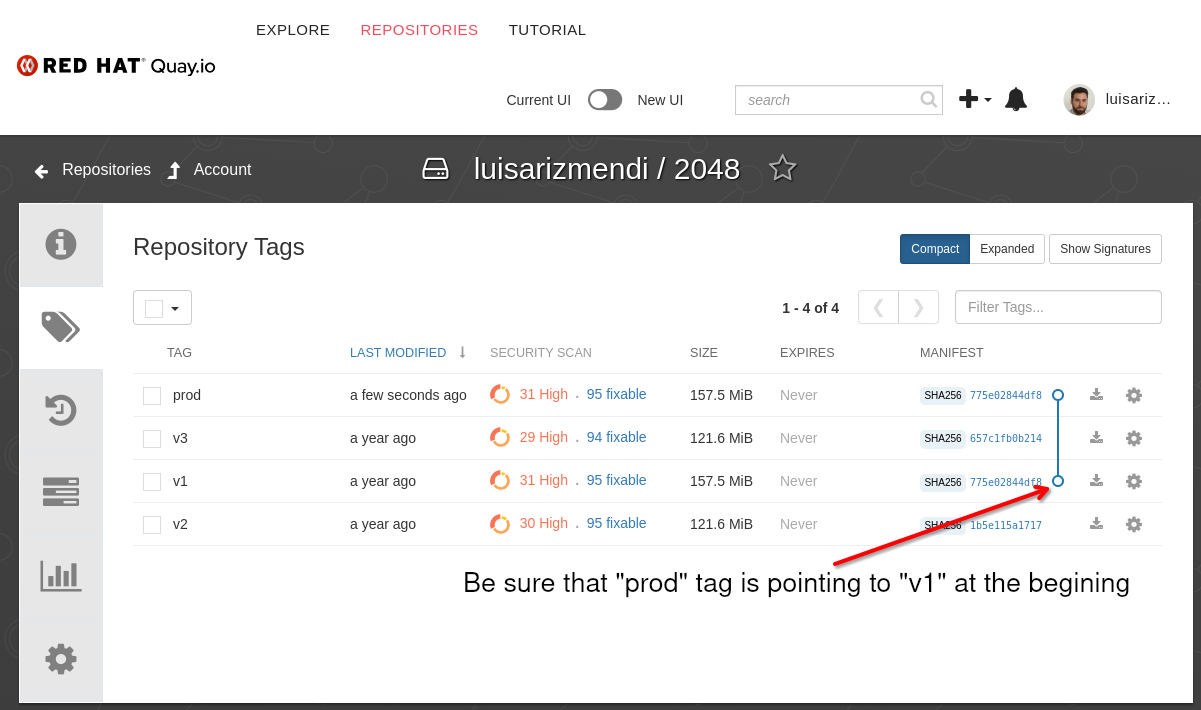
- The
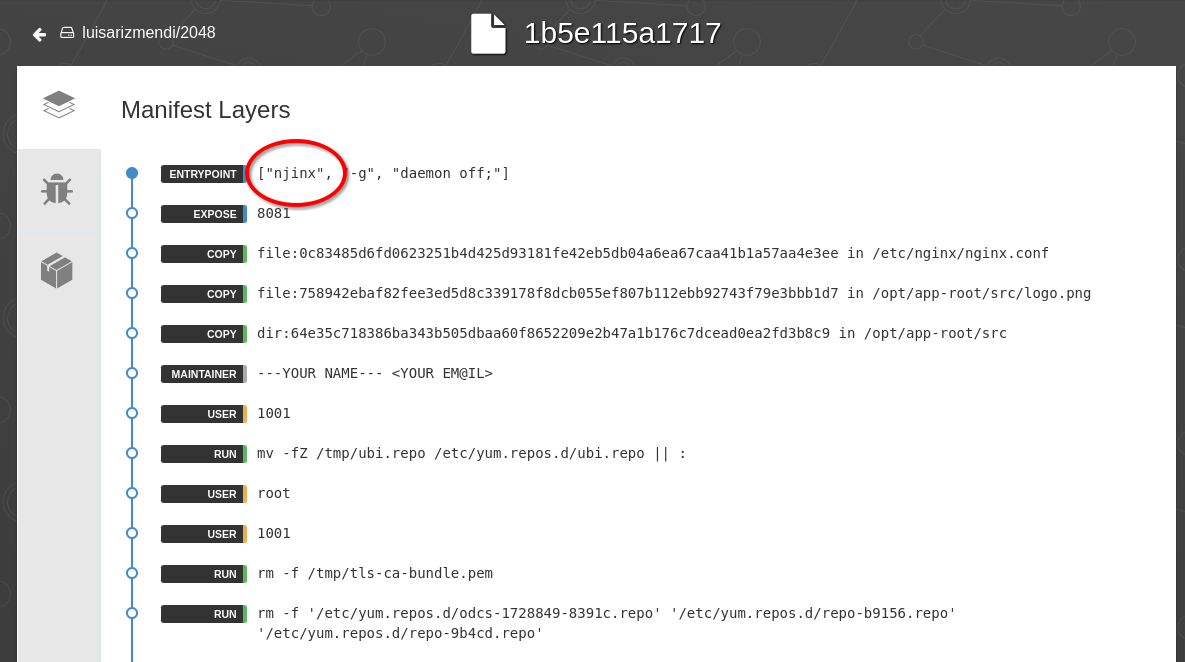
v2image is the one that the developer created to fix the image problem… but he introduced an additional (big) issue while creating the Containerfile that will make the image not able to boot. He mistypednginxin the Containerfile. You can show this by clicking in quay.io in the “Manifest” while in the “tag” page of the repository (it will show something like “SHA256 1b5e115a1717”):
Note
Even though we know that this image won’t boot, we will update the
prodtag to point tov2so we will see two things, first thatpodman auto-updatewill detect that a new version of the container image is availabe, and second how the self-healing capability ofpodman auto-updaterollback to versionv1becausev2is not able to boot.
- Run the
watch 'podman auto-update --dry-run; echo ""; podman ps'command on the edge device as the non-root user.
watch 'podman auto-update --dry-run; echo ""; podman ps'
This will show the status of Podman auto-update (if it detects a new version) and the running containers. Keep this terminal visible during the next step.
Every 2.0s: podman auto-update --dry-run; echo ""; podman ps                                                                       edge-848bcd4d1537: Mon Jan  8 14:58:56 2024

            UNIT                    CONTAINER            IMAGE                            POLICY      UPDATED
            container-app1.service  1ec5693e0e3d (app1)  quay.io/luisarizmendi/2048:prod  registry    false

CONTAINER ID  IMAGE                            COMMAND     CREATED         STATUS         PORTS                          NAMES
1ec5693e0e3d  quay.io/luisarizmendi/2048:prod              34 minutes ago  Up 34 minutes  <edge device ip>:8081->8081/tcp  app1
-
Go to the tag page on the 2048 repository in
Quay.ioand click “Add New Tag” on the gearwheel (at the right) for thev2image. Create a new tagprod(it will say “Move” instead of “Create” because the tagprodalready exists). -
Show how the new image is detected ( “UPDATED” changed to
pending) in CLI Terminal. Then show how the new container is created (check the “CREATED” time that will move to 1 seconds when the image is deployed). Finally show how Podman re-generates a new container version (which in fast isv1) as rollback by going again to the APP inhttp:<edge device IP>:8081. You will be able to reach out to the APP because of the rollback (otherwise no APP will be running during the intentionally added issue in the Containerfile ofv2). -
Finally go to
quay.ioand move tagprodtov3where both the image and the Containerfile issues have been solved. You will see how Podman auto-update is able to deploy the new version and if you access the AAP you will see how the image is now loaded.
Note
If the image does not appear, be sure that you are not caching the page by opening the page in Private/Incognito mode.
If you luanch
podman inspect appyou will find in the labels of the container that autoupdate policy is set to registry
Deploying an APP in Podman in a declarative way
Those APPs were deployed by default as part of the onboarding, but what happens if I need to deploy a specific APP in a specific device? and what If you want to do it in a declarative way? The answer is Quadlet.
You can create new containerized applications by just putting a descriptor in /usr/share/containers/systemd/ or /etc/containers/systemd (HOME/.config/containers/systemd/ for rootless containers). During this step we will demo how we can use AAP and EDA to create this kind of APPs in a GitOps way.
There is Job already created to deploy (root) container images based on a file descriptor located in GIT.
- Open Gitea and show the
device-edge-configs/APPs/podman/quadletfolder. There will be the descriptors that will be created on the edge devices. You have one preloaded:app_fuxa_scada.container. Open that file and show the config (mainly the image and port).
Note
That application needs quite large container images. If you are running the demo/workshop in an environment with low bandwidth you might use any other container image that you know would work better.
- Here you have two options. First you can go into the AAP and run the Template “Create Quadlet APP” or you can change something (for example, change the port where it is published on the host, from
PublishPort=1881:1881toPublishPort=1882:1881) on the descriptor on Gitea and see how EDA gets the Job launched for you. If you choose the second option remember to open first the “Jobs” page in the AAP so people can see how the Job is auto-launched.
Note
You can also open a Terminal in the edge device and run
watch podman pscommand as root and keep that CLI visible to check how the new Containers created right after running the AAP Template or changing the file in Gitea.
- Go to the edge device Terminal and as the root user (this time we deployed a root container in contrast with all the rest of containers that were rootless) check the running containers:
[root@edge-848bcd4d1537 ~]# podman ps
CONTAINER ID  IMAGE                             COMMAND     CREATED         STATUS         PORTS                   NAMES
a164ed35c012  docker.io/frangoteam/fuxa:latest  npm start   17 seconds ago  Up 17 seconds  0.0.0.0:1882->1882/tcp  systemd-app_fuxa_scada
-
Show the APP by visiting
http:<edge device IP>:<configured port> -
(Optional) You can go back to Gitea and change something (ie. the port) in the
device-edge-configs/APPs/podman/quadlet/app_fuxa_scada.containerfile and see how that change is applied to the application.