Section 5 - Bulletproof system upgrades
In this section we will modify the image that we created in Section 1 by removing and adding packages to the definition.
Note
We will remove (intentionally) some of the packages that are, in fact, needed to make the manual overwrite prevention system that we have seen in Section 3 work (such as
python3-inotify). We will do it in order to demonstrate how the system will realize that we made a mistake excluding those packages and how it will rolback to the previous image version were those packages were present.
- Open a Terminal en the edge system and run
watch "rpm-ostree upgrade --preview"command as root to verify that there are no system updates available and to watch changes while we publish the new image in the following steps. Keep this CLI Terminal visible.
Every 2.0s: rpm-ostree upgrade --preview                                                                                                                        edge-848bcd4d1537: Tue Jan  9 11:34:51 2024

1 metadata, 0 content objects fetched; 153 B transferred in 0 seconds; 0 bytes content written
Note: --check and --preview may be unreliable.  See https://github.com/coreos/rpm-ostree/issues/1579
No updates available
- Open
device-edge-images/production-image-definition.yamlin Gitea and review thebuilder_compose_pkgspackages. Remove thepython3-inotifypackages and include an additional one (ie.zsh), so we are simulating that someone wants to add a package but, when he reviews the image definition, he thinks that thepython3-inotifypackage can be safely removed (which is not the case) too.
---
builder_blueprint_name: rhde-image-student1
builder_request_timeout: 300
builder_wait_compose_timeout: 2400
builder_compose_type: edge-commit
builder_skip_repo: true
builder_compose_pkgs:
  - microshift
  - microshift-greenboot
  - NetworkManager-wifi
  - firewalld
  - openshift-clients
  - podman
  - vim-enhanced
  - NetworkManager-wifi
  - "fuse-overlayfs"
  - "setroubleshoot-server"
  - "slirp4netns"
  - "net-tools"
  - "git"
  - "python3-pip"
  - "zsh"
builder_compose_customizations:
  user:
    name: "ansible"
    description: "Admin user"
    password: "R3dh4t1!"
    groups: ["users", "wheel"]
  services:
    enabled: ["microshift"]
  firewall.services:
    enabled: ["80/tcp", "443/tcp", "6443/tcp"]
Note
You can find Blueprints for versions v2 and v3 on
device-edge-images/examplesin Gitea.
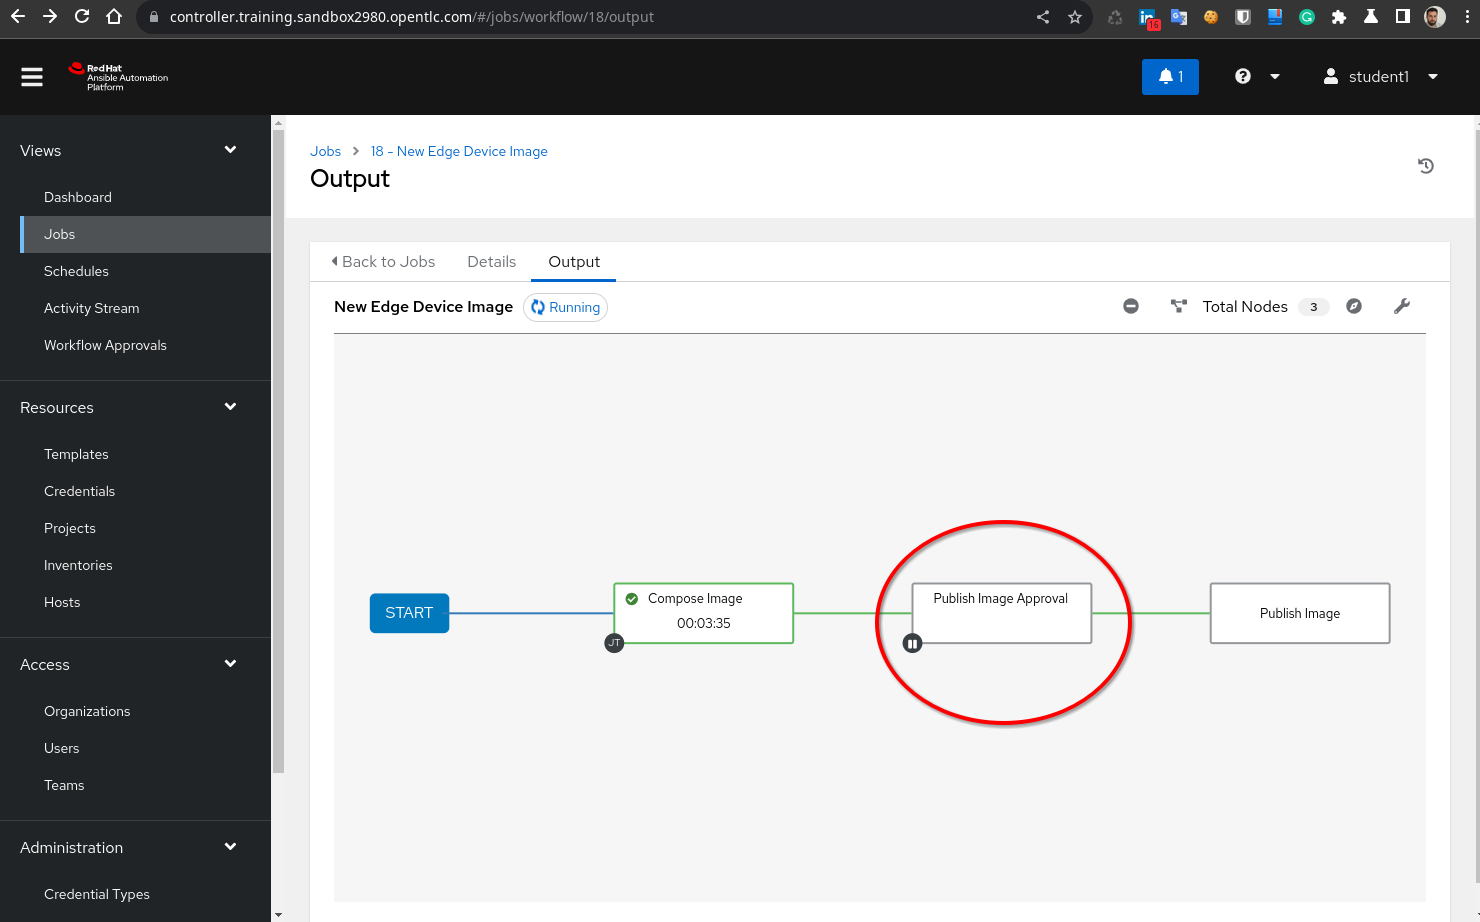
- As soon as you change the image definition you can open the AAP and show the Workflow running in the “Jobs” page which will use the Image Builder service to create the new Red Hat Device Edge.
Note
Again, this can take a while depending on the machine resources.
- Meanwhile the image is being created, open a new CLi terminal in the edge device as root user and show the Greenboot scripts and configuration files in
ls /etc/greenboot/. There you will see how Greenboot configuration has mainly 4 different parts:
greenboot.confconfiguration file where we can setup, for example, the number of boot attempts before marking a system as failed- scripts under
green.ddirectory that are executed when a sucesfull upgrade is completed - scripts under
red.ddirectory that are executed when the system upgrade failed - scripts under
checkdirectory where the health check scripts are located. Those will make the system rolback (if they are located underrequired.d) or just show a Warning message (the ones underwanted.d).
We have the 01-check-packages.sh health-check scipt located under required.d (which means that if it fails during an upgrade, the system will rollback to the previous image version). This script checks if python3-inotify packages are installed in the system and if not it will fail.
Note
It’s important to note that, due to simplicity, here we are performing this simple check, but these scripts could also be used for much more interesting points such as monitor the status of the running applications on top of the system or checking the connectivity from external systems.
#!/bin/bash

if ! rpm -q python3-inotify &>/dev/null; then
  echo "Error: python3-inotify is not installed."
  exit 1
fi

echo "python3-inotify is installed."
Note
If you deployed Microshift you will find an auto-generated required script named
40_microshift_running_check.shto check the Microshift status.
You can also show that there is an additional script (01-slack-notification.sh) configured in Gitea under red.d which will send a message to Slack in case of a system upgrade failure.
- Check “Jobs” page in AAP until the “Compose Image” Job finish. Then click the “New Edge Device Image” Workflow Job, click the “Publish Image Approval” box and finally click on “Approve” (button left) to let the workflow progress
- Once the Worflow has finished publishing the new image, you will see in the edge device opened CLI Terminal that there was a change indicating that there is an upgrade available. If you want to have a better view just close the
watchcommand and directly runrpm-ostree upgrade --preview. That will show the changes introduced with that new version.
Note
Remember that you will see not only the packages that you removed/installed, but also all the required dependencies.
  [root@edge-848bcd4d1537 ~]# rpm-ostree upgrade --preview
1 metadata, 0 content objects fetched; 153 B transferred in 0 seconds; 0 bytes content written
Note: --check and --preview may be unreliable.  See https://github.com/coreos/rpm-ostree/issues/1579
AvailableUpdate:
        Version: 9.2 (2024-01-08T23:06:38Z)
         Commit: e79c754e3d5cc29a6f21dff9ebc6b2b5726ebe89999fc87f8d89eb620c3f930f
        Removed: emacs-filesystem-1:27.2-8.el9_2.1.noarch
                 git-2.39.3-1.el9_2.x86_64
                 git-core-2.39.3-1.el9_2.x86_64
                 git-core-doc-2.39.3-1.el9_2.noarch
                 groff-base-1.22.4-10.el9.x86_64
                 ncurses-6.2-8.20210508.el9.x86_64
                 perl-Carp-1.50-460.el9.noarch
                 perl-Class-Struct-0.66-480.el9.noarch
                 perl-DynaLoader-1.47-480.el9.x86_64
                 perl-Encode-4:3.08-462.el9.x86_64
                 perl-Errno-1.30-480.el9.x86_64
                 perl-Error-1:0.17029-7.el9.noarch
                 perl-Exporter-5.74-461.el9.noarch
                 perl-Fcntl-1.13-480.el9.x86_64
                 perl-File-Basename-2.85-480.el9.noarch
                 perl-File-Find-1.37-480.el9.noarch
                 perl-File-Path-2.18-4.el9.noarch
                 perl-File-Temp-1:0.231.100-4.el9.noarch
                 perl-File-stat-1.09-480.el9.noarch
                 perl-Getopt-Long-1:2.52-4.el9.noarch
                 perl-Getopt-Std-1.12-480.el9.noarch
                 perl-Git-2.39.3-1.el9_2.noarch
                 perl-HTTP-Tiny-0.076-460.el9.noarch
                 perl-IO-1.43-480.el9.x86_64
                 perl-IPC-Open3-1.21-480.el9.noarch
                 perl-MIME-Base64-3.16-4.el9.x86_64
                 perl-POSIX-1.94-480.el9.x86_64
                 perl-PathTools-3.78-461.el9.x86_64
                 perl-Pod-Escapes-1:1.07-460.el9.noarch
                 perl-Pod-Perldoc-3.28.01-461.el9.noarch
                 perl-Pod-Simple-1:3.42-4.el9.noarch
                 perl-Pod-Usage-4:2.01-4.el9.noarch
                 perl-Scalar-List-Utils-4:1.56-461.el9.x86_64
                 perl-SelectSaver-1.02-480.el9.noarch
                 perl-Socket-4:2.031-4.el9.x86_64
                 perl-Storable-1:3.21-460.el9.x86_64
                 perl-Symbol-1.08-480.el9.noarch
                 perl-Term-ANSIColor-5.01-461.el9.noarch
                 perl-Term-Cap-1.17-460.el9.noarch
                 perl-TermReadKey-2.38-11.el9.x86_64
                 perl-Text-ParseWords-3.30-460.el9.noarch
                 perl-Text-Tabs+Wrap-2013.0523-460.el9.noarch
                 perl-Time-Local-2:1.300-7.el9.noarch
                 perl-constant-1.33-461.el9.noarch
                 perl-if-0.60.800-480.el9.noarch
                 perl-interpreter-4:5.32.1-480.el9.x86_64
                 perl-lib-0.65-480.el9.x86_64
                 perl-libs-4:5.32.1-480.el9.x86_64
                 perl-mro-1.23-480.el9.x86_64
                 perl-overload-1.31-480.el9.noarch
                 perl-overloading-0.02-480.el9.noarch
                 perl-parent-1:0.238-460.el9.noarch
                 perl-podlators-1:4.14-460.el9.noarch
                 perl-subs-1.03-480.el9.noarch
                 perl-vars-1.05-480.el9.noarch
                 python3-inotify-0.9.6-25.el9.noarch
                 python3-pip-21.2.3-6.el9.noarch
          Added: zsh-5.8-9.el9.x86_64
- You have two options now. You can perform the upgrade manually from that same edge device CLI terminal, or you can use the pre-configured “OSTree Upgrade” Workflow Template in AAP that will upgrade all devices contained in the inventory (in our case just one…). If you choose to run manually the Template, a new Workflow Job will be launched. It will execute the “Run command” Job and then wait for “Reboot approval”.
If you follow the CLI option, you can run sudo rpm-ostree upgrade as root user in the edge system and that will download the system image changes. Then you will need to reboot your system (systemctl reboot) to move the system to the new image version.
Note
Ostree images work like your IOS or Android phones, where you reboot to use a new upgraded image, so we will need to reboot our system.
No matter if you are using the AAP Job or the CLI, before performing the upgrade be sure that you are showing the edge device Console terminal to see the device booting. This terminal is not an SSH terminal but the actual video output of the system. If you are using VMs for your demo/workshop you can do it just by opening the VM’s console but if you are using physical servers you will need either an external screen connected to your device or a Video Capture Card (as the one shown in the Recommended Hardware Section to show the output on your laptop.
-
Once you launch the reboot, you will see in the Console output this behaviour:
- System shutdown
- System boots and chooses
ostree:0on the Brub menu. That means that it selects the most recent version of the OSTree image, so the one recently published.

- System finishes booting. At that point the Greenboot scripts will start being checked and, since we removed some required packages by our script, it will fail. That will trigger after one minute or so a new reboot again
- System will try to boot again from
ostree:0but again the Greenboot script will fail and then the third reboot will take place -
This time the system will rollback to the previous image (
ostree:1in our case) where thepython-inotifypackage was available, so this time the Greenboot scripts won’t fail and the reboot won’t be trigger again. - You can show how the
01-slack-notification.shscript located in thered.dgreenboot directory was executed by showing the messages in your Slack channel.
- After the third boot SSH to the edge device again and show the warning message that says that a fallback action was taken in the system:
[ansible@edge-manager-local ~]$ ssh <edge device ip>
ansible@<edge device ip>'s password:
Boot Status is GREEN - Health Check SUCCESS
FALLBACK BOOT DETECTED! Default rpm-ostree deployment has been rolled back.
Health check logs from previous boot:
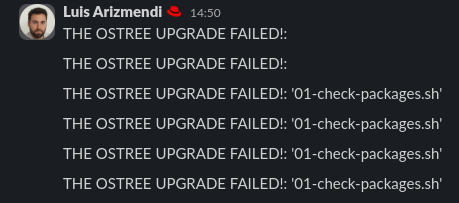
Script '01-check-packages.sh' FAILURE (exit code '1'). Continuing...
You can also check the Journal and show the errors with this command: journalctl | grep 01-check-packages.sh | grep Error
- Show how the system still detects that there is a system upgrade with
rpm-ostree upgrade --check, because we are actually using the “old image”:
[root@edge-848bcd4d1537 greenboot]# rpm-ostree upgrade --check
1 metadata, 0 content objects fetched; 153 B transferred in 0 seconds; 0 bytes content written
Note: --check and --preview may be unreliable.  See https://github.com/coreos/rpm-ostree/issues/1579
AvailableUpdate:
        Version: 9.2 (2024-01-08T23:06:38Z)
         Commit: e79c754e3d5cc29a6f21dff9ebc6b2b5726ebe89999fc87f8d89eb620c3f930f
           Diff: 57 removed, 1 added
Note
This output is for
rpm-ostree upgrade --checknotrpm-ostree upgrade --preview. The difference is that with--checkwe hide the package change datails
- Do not perform again the upgrade since you will hit the same behaviour, first create a third image where we add
zshbut keeppython-inotifyusing this Blueprint:
---
builder_blueprint_name: rhde-image-student1
builder_request_timeout: 300
builder_wait_compose_timeout: 2400
builder_compose_type: edge-commit
builder_skip_repo: true
builder_compose_pkgs:
  - microshift
  - microshift-greenboot
  - NetworkManager-wifi
  - firewalld
  - openshift-clients
  - podman
  - vim-enhanced
  - NetworkManager-wifi
  - "fuse-overlayfs"
  - "setroubleshoot-server"
  - "slirp4netns"
  - "net-tools"
  - "git"
  - "python3-pip"
  - "python3-inotify"
  - "zsh"
builder_compose_customizations:
  user:
    name: "ansible"
    description: "Admin user"
    password: "R3dh4t1!"
    groups: ["users", "wheel"]
  services:
    enabled: ["microshift"]
  firewall.services:
    enabled: ["80/tcp", "443/tcp", "6443/tcp"]
- After creating and publishing the new image perform the system upgrade again (either with the CLI on the edge device or using the “ OSTree Upgrade” Job in AAP) and show how this time the system was sucesfully upgraded.
TIP: Reducing the demo/workshop time by pre-creating images in advance
Creating those two additional images takes time. If you feel that you cannot fill that time with something useful or you think you won’t have time to invest on that activity you can pre-create the images thanks to a trick that was introduced in the lab when it was deployed.
If you check device-edge-images/production-image-deploy.yml file in Gitea you can see that, by default, we are “publishing” the last image created by the image builder, but we can change the behaviour following this steps:
- Create the base image (Section 1)
- Create the upgrade where we remove
pyhton-inotifyand addzsh. You can use the “Compose Image” or just use the GitOps approach or the Workflow without approving the publishing (it’s just to save time, it does not affect if you publish in any case) - Create the second upgrade where we include
pyhton-inotifyagain - Change the
device-edge-images/production-image-deploy.ymltoproduction_image_version: "0.0.1". That will trigger the “Publish Image” Job in AAP.
At that time you will have the base image published. You can go through the different Sections and now, when you reach this Section where you have to perform the upgrade you can just change to production_image_version: "0.0.2" and that will publish the second image (first upgrade without pyhton-inotify) without having to create the image, because it’s already there in the system. You can repeat that step with production_image_version: "0.0.3" for the final image.
Just only remember that you configured a fixed image version and not the latest since if you create a new image and let the usual Workflow Job publish that image, you will end up creating that new image but not publishing it.